In this article, we will learn what is arduino? and how we can use arduino circuit board with node app?, It will be very interesting and from this you will get the idea about how you can create an iOT app.
In this, we will connect the arduino circuit board with node application using some npm modeules. Let's see how we can connect nodeJs with arduino circuit board
Step 1: Prerequisites:
1. Laptop/desktop ( Installed Nodejs, NPM, Arduino IDE )
2. Arduino Kit ( Connector to connect arduino and laptop, Power will be providing through connector also)
3. A LED , Register, Wire
Step 2: Upload Firmata in your Arduino IDE:
What is Firmata:
Firmata is a set of rules or you can say a protocol for establishing communication with microcontrollers from software on computer, smartphoes or electronic device. Standard firmata is a library that provide features to communicate arduino cercuit board to your computer.
In this step, we will learn how we can upload firmate in your arduino IDE:
1. Open your arduino kit.
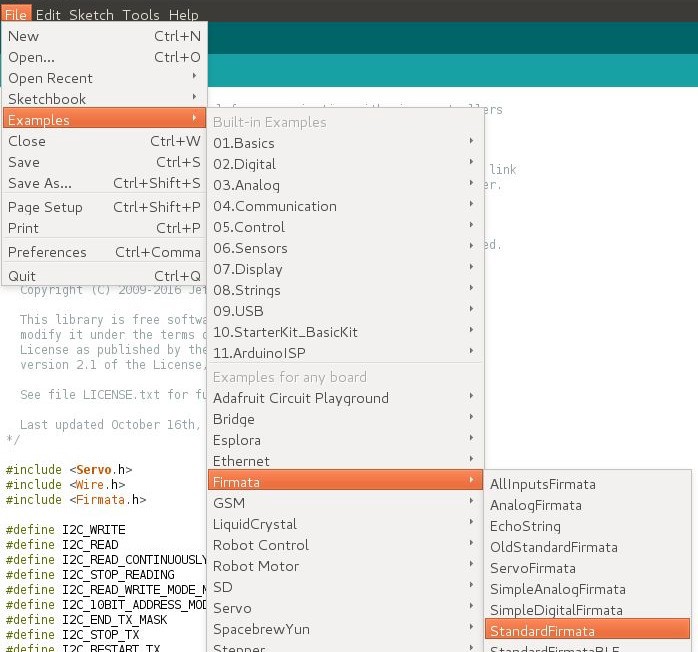
2. Goto File > Examples > Firmata > StandardFirmata
3. Click on upload button on your arduino IDE.This library will upload to your arduino kit.
For more details, see in the below snapshot:
Source: idkblogs.com
Step 3: Work on nodejs:
In this, we will work on nodejs, we will write our code for Arduino Circuit Board and later we will upload this into arduino. We will create a node server ( small node app ) and will connect this node server to arduino cercuit board.
* Open your laptop ( Assuming that you have already installed nodejs )
* Create a directory in any location
* Navigate to location of above directory and run below command-
npm init( The npm init will create a file, package.json which will have all the information about this project )
Now enter the information accordinly, Saw below line for help:
                        “name”: “arduino_with_nodejs”,
                        “version”: “1.0.0”,
                        “description”: “This is the demo to connect nodejs to arduino”,
                        “main”: “index.js”,
                        “scripts”: {
                        “test”: “echo \”Error: no test specified\” && exit 1"
                        },
                        “keywords”: [
                        “ShubhamArduino”
                        ],
                        “author”: “Shubham Verma”,
                        “license”: “ISC”,
If you are getting any error then copy the below written code and replace your whole code which is written in your package.json.
                        {"name": "arduino_with_nodejs",
                        "version": "1.0.0",
                        "description": "This is the demo to connect nodejs to arduino",
                        "main": "index.js",
                        "scripts": {"test": "echo \"Error: no test specified\" && exit 1"},
                        "keywords": ["ShubhamArduino"],
                        "author": "Shubham Verma",
                        "license": "ISC",
                        "links": {"johnny-five": "https://www.npmjs.com/package/johnny-five"},
                        "dependencies": {"johnny-five": "^0.14.3"}
                        }
Step 4: Install johnny-five module to interact with arduino:
To install "johnny-five" npm module in our nodejs app, we need to run below command
npm install johnny-five --saveThe above command will create a folder, node_modules and keep all the required library inside this folder.
Step 5: Create file "index.js":
In this step we need to create a file name "index.js" in the root directory and write the below code in "index.js" file.
index.js
                        var five = require('johnny-five');
                        var board = new five.Board();
                        board.on('ready', function () {
                        var led = new five.Led(8);
                        led.blink(1000);
                        });

Source: idkblogs.com
Step 6: Connect your LED object to arduino like in images:
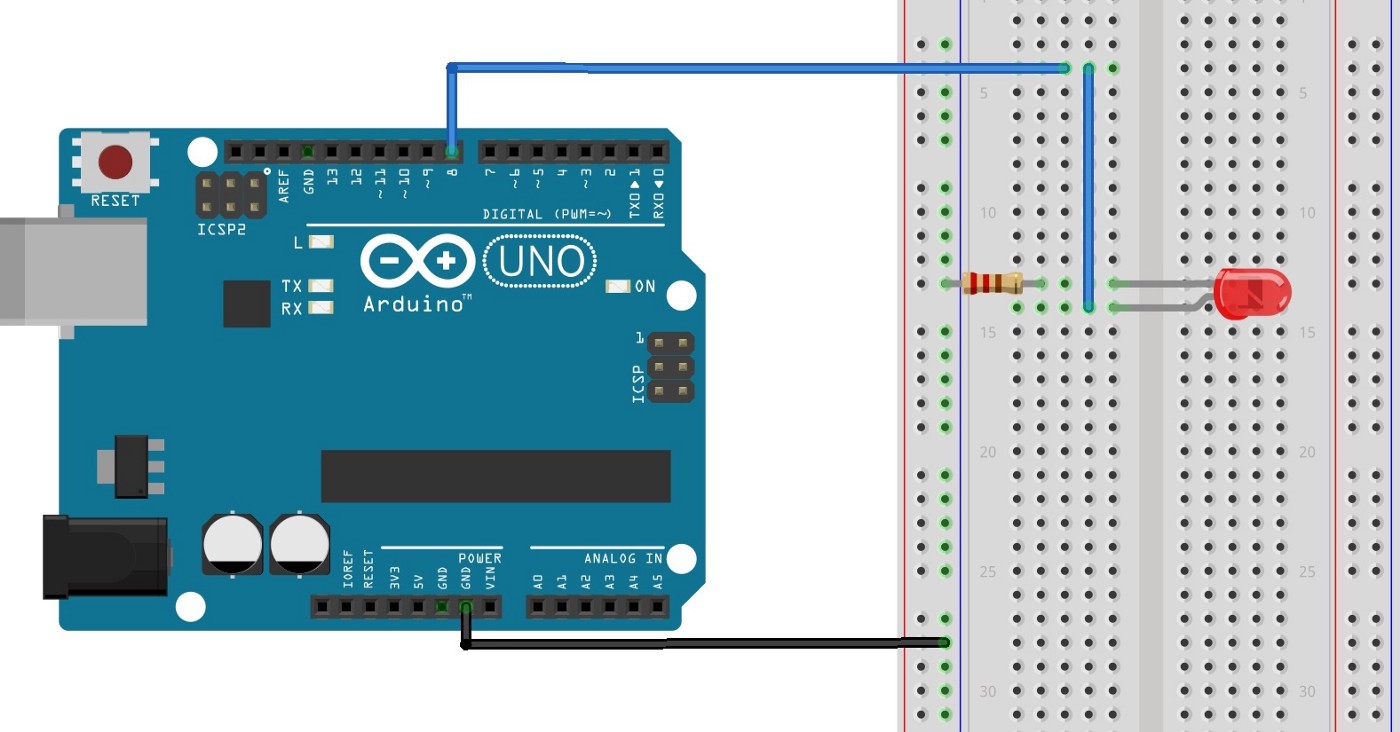
Source: idkblogs.com
Step 7: Run your node app by using following command:
node index.jsCongratulations… Now your LED will be blinking after every 1 second.
Now you can do whatever to you JavaScript code with this arduino. If you want to stop the node app, press “CTRL+C” and start node app “node index.js”
Conclusion:
In this article, we learned how we can connect arduino circuit board with nodejs and how to write program in
nodejs for arduino circuit board.
Also we learned the pin connection of arduino circuit board.
Support our IDKBlogs team
Creating quality content takes time and resources, and we are committed to providing value to our
readers.
If you find my articles helpful or informative, please consider supporting us financially.
Any amount (10, 20, 50, 100, ....), no matter how small, will help us continue to produce
high-quality content.
Thank you for your support!
Thank you
I appreciate you taking the time to read this article. The more that you read, the more things you will know. The more that you learn, the more places you'll go.
If you’re interested in Node.js or JavaScript this link will help you a lot.
If you found this article is helpful, then please share this article's link to your friends to whom this is required, you can share this to your technical social media groups also.
You can follow us on our social media page for more updates and latest article updates.
To read more about the technologies, Please
subscribe us, You'll get the monthly newsletter having all the published
article of the last month.


