A
Test case is basically line of codes where we write the condition to test the another line of code. Here we ensure
that this particular system is working according the expectation or satisfy the requirements.
Test cases can also help to determine the problem, bugs in existing system. We write the test cases
to get the surety that system is working fine.
In this article, we'll write the test cases for the APIs to provide the assertion and best quality.
# Introduction:
In this article we will write the test cases for our API.
Contents:
# Mocha
# Chai
# Prerequisites
# Project Setup
# The server
# Write the test case
# Run the test case
# Conclusion
# Mocha:
Mocha is used for testing, It is a javascript framework for nodejs. Mocha is asynchronous. Mocha is used to build an environment where we can write and run our test cases.We can also use our assertion libraries under the mocha environment, here we will use “Chai”.
Start Writing Test Cases in your node app from scratch.
# Chai && Why Chai ?:
“Chai” is a BDD / TDD assertion library for node and the browser that can be delightfully paired with any javaScript testing framework. “Chai” provide a better way to write the test cases under mocha environment.Actually Mocha provide the environment for making our test, But we need to test our API and our API using http calls like GET, PUT, DELETE, POST etc. So we need a assertion library to fix this challenge. Chai helps us to determine the output of this test case.

Start Writing Test Cases in your node app from scratch.
Chai provide the various interface: “should”, “expect”, “assert”.

Start Writing Test Cases in your node app from scratch.
# Prerequisites:
* You should have installed Nodejs in your system.
* You should have installed Mocha in your system globally. If not, install by given command:
npm install -g mocha# Project Setup:
Here is the project structure, Yo need to follow this:
                            myApp

                            — — →server.js

                            — — →test — — — — — — — →apitest.js

                            — — →package.json

                            — — →node_modules
# Server Setup:
Now it’s time to make our node server where we will write our API, further we will write our test case to test these APIs. We will use express framework for nodeJs to write our API in easy way.
STEP 1: Create your package.json by using following command:
After this command you will be asked to enter details of this project then enter the information. Now replace your package.json content with below code. Your package.json will have only below code.
package.json:
ç
                              {
                                "name": "test-case-demo",
                                "version": "1.0.0",
                                "description": "A demo app to write the test cases in node app by idkblogs.com",
                                "main": "server.js",
                                "directories": {
                                     "test": "test"
                                   },
                                "scripts": {
                                     "test": "mocha — timeout 10000",
                                     "start": "node server.js"
                                  },
                                "author": "Shubham Verma",
                                "license": "ISC",
                                "devDependencies": {
                                     "chai": "4.2.0",
                                     "chai-http": "4.2.1",
                                     "mocha": "5.2.0"
                                  },
                                "dependencies": {
                                    "express": "4.16.4"
                                   }
                                }
STEP 2: Install the dependencies:
Run the below command :
npm installChai
Chai-http
Mocha
Express
STEP 3: Create your server.js file:
For this we'll create a simple node application for demo. Now its time to create a server file name server.js inside your root directory ( myApp-> server.js ). Please write the below code into your server.js file.
server.js:
                    const express = require('express');
                    const app = express();
                    const port = 3300;

                    app.get('/message', function (req, res) {
                         res.send('This is the message');
                    });

                    app.get('/media', function (req, res) {
                    var response = {

                    podcasts: [{
                           "description": "some text",
                           "id": 574,
                           "title": "Why long-term value is a winning bet",
                           "media": "podcast",
                           "publishedDate": "2018-12-19T18:00:00.000Z",
                           "isLive": true,
                           "isDeleted": false,
                           "link": "https://podcasts.com/574",
                           "createdAt": "2018-12-20T06:30:00.618Z",
                           "updatedAt": "2019-01-31T06:30:00.864Z"
                        }],
                     total: 1
                    }

                    if (response.podcasts.length > 0) {
                         res.send(response);
                    } else {

                    var errorObj = {
                         httpCode: 404,
                         message: 'NOT_FOUND',
                         description: 'The resource referenced by request does not exists.',
                         details: 'Podcast is not available'
                    }

                       res.status(404);
                       res.send(errorObj)
                     }
                    });

                    app.listen(port, function () {
                       console.log("\nServer is running on port " + port);
                    });

                    module.exports = app; // for testing
# Let's understanding the above codes:
                          const express = require(‘express’);

                          const app = express();
const express = require(‘express’);
const app = express();
The above code we are using the require function to include the “express module and before we can start using the express module, we need to make an object of the express module.
                          const port = 3300; // Defining the port number where our server will run, the default host is localhost.

                          app.get(‘/message’, function (req, res) {
                            res.send({‘message’: ‘This is the message’});
                          });
The above code is a simple API with end point ”/message”, It accepts all HTTP GET request with endpoint:“/message”.
                          app.get(‘/media’, function (req, res) {
                            var response = {
                            podcasts: [{
                              “description”: “some text”,
                              “id”: 574,
                              “title”: “Why long-term value is a winning bet”,
                              “media”: “podcast”,
                              “publishedDate”: “2018–12–19T18:00:00.000Z”,
                              “isLive”: true,
                              “isDeleted”: false,
                              “link”: “https://podcasts.com/574",
                              “createdAt”: “2018–12–20T06:30:00.618Z”,
                              “updatedAt”: “2019–01–31T06:30:00.864Z”
                            }],
                          total: 1
                          }

                          if (response.podcasts.length > 0) {
                            res.send(response);
                          } else {
                            var errorObj = {
                            httpCode: 404,
                            message: ‘NOT_FOUND’,
                            description: ‘The resource referenced by request does not exists.’,
                            details: ‘Podcast is not available’
                          }

                            res.status(404);
                            res.send(errorObj)
                          }
                        });
The above code is also a simple API with end point ”/media”, It accepts all HTTP GET request with endpoint “/media” and return an object in response with status code 200.
                          app.listen(port, function () {
                            console.log(“\n Server is running on port “ + port);
                          });
The above code is the important code to run this server. It tells to node that this server is running on given port ( 3300 here ).
module.exports = app; // for testingThe above line is for testing purpose, It will return the main server object. Using this server object we will create our test cases. Now our server part is done, Lets run our server.
STEP 4: Run the server:
Now our simple node server has been created, its time to start the server. Open CMD/Terminal, Goto the project location and hit given command:
npm startNow you can see the below message:
Server is running on port 3300
Start Writing Test Cases in your node app from scratch.
It means server is started.
STEP 5: Test the APIs:
Now we need to test the server so Let’s check on browser. Open browser and hit url “localhost:3300/message”. After this you can see the response on browser “{“message”:”this is the message” }”

Start Writing Test Cases in your node app from scratch.
It means our one API with endpoint “/message” is working fine. Now test the other API using same process with endpoint “/media”. You can see the result as :

Start Writing Test Cases in your node app from scratch.
It means our both API is working fine.
# Write the test case:
Now it’s time to write the test cases for our both API which is written on above server file. We will use mocha and chai to write the test cases. So lets start to write test case. Create a file with name apitest.js inside test folder ( myApp — -> test — -> apitest.js): Copy below code and paste into your apitest.js:
apitest.js:
                          let chai = require(‘chai’);
                          let chaiHttp = require(‘chai-http’);
                          var should = chai.should();
                          chai.use(chaiHttp);
                          let server = require(‘../app’);//Our parent block

                          describe(‘Podcast’, () => {
                           describe(‘/GET media’, () => {
                               it(‘it should GET all the podcast’, (done) => {
                               chai.request(server)
                                 .get(‘/media’)
                                 .end((err, res) => {
                                       (res).should.have.status(200);
                                       (res.body).should.be.a(‘object’);
                                       (res.body.podcasts.length).should.be.eql(1);
                                       done();
                                    });
                                 });
                            });

                            describe(‘/GET message’, () => {
                               it(‘it should GET a message’, (done) => {
                               chai.request(server)
                                   .get(‘/message’)
                                   .end((err, res) => {
                                         (res).should.have.status(200);
                                         (res.body).should.be.a(‘object’);
                                         done();
                                      });
                                   });
                               });
                          });
# Description and understanding of file apitest.js:
                          let chai = require(‘chai’);
                          let chaiHttp = require(‘chai-http’);
                          var should = chai.should();
                          chai.use(chaiHttp);
In the above code we are importing the library. “chai” is the module as describe at the top of the tutorial.
describe(‘Podcast’, () => { …… });The above describe function is use to describe about what we want. It takes two parameter a string ( anything that tells you about the operation ) and a callback function.
it(‘it should GET all the podcast’, (done) => { });The “it()” used to tells us that what is going to be tested in this method.
                          chai.request(server)
                          .get(‘/media’)
                          .end((err, res) => {
                          (res).should.have.status(200);
                          (res.body).should.be.a(‘object’);
                          (res.body.podcasts.length).should.be.eql(1);
                          done();
                          });
In the above code we are going to test tha “/media” API in with “server” object. The “server” object is our node server’s object and getting by import
let server = require(‘../app’);(res).should.have.status(200); Check the status of that API ( HTTP status code should be 200.(res.body).should.be.a(‘object’); Check body of response should be an object.(res.body.podcasts.length).should.be.eql(1);Check the length of the res.body.podcasts should be 1.done(); will be called when everything is ok. And the same description for other test case.# Run the test case:
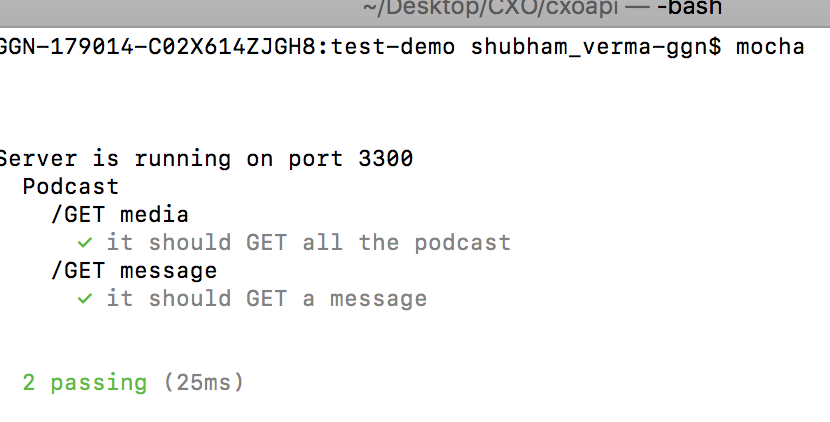
Now it’s time to run our test cases. To do this open CMD/Terminal, go to the server location and run command:
mocha
Start Writing Test Cases in your node app from scratch.
or
npm test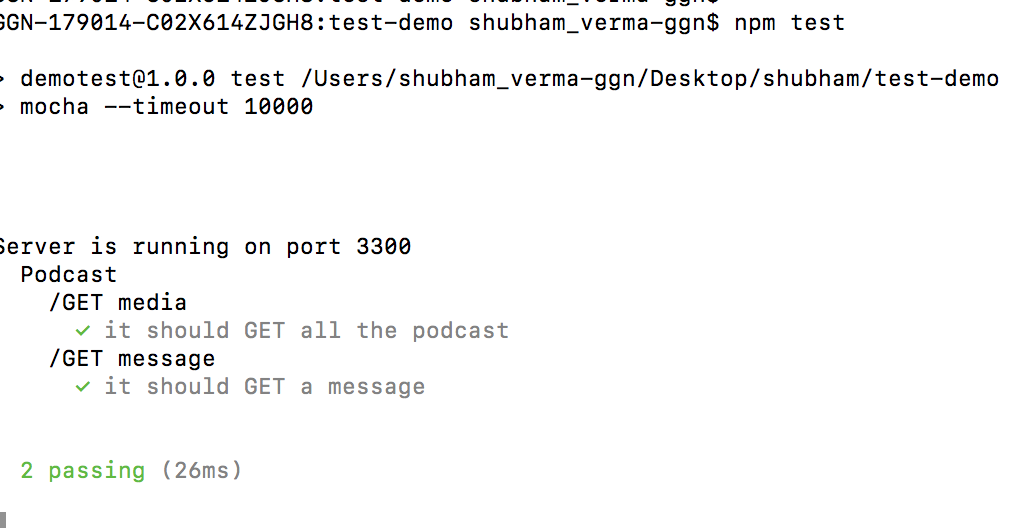
Start Writing Test Cases in your node app from scratch.
In the above result:
You can see the result "2 Passing", means our all the test cases have been passed, We have created 2 test cases and both are passed. It means our API is good
and will respond as expected. Thats great news.
# Conclusion:
We leanred following things in this article:
* What is test case?
* What is mocha?
* What is chai?
And
* We have created a server.
* Created 2 APIs associated with this server.
* Wrote test cases for those APIs.
* Run our test cases.
* Verified and sure that APIs will behave as expected.
* Now, We are able to write the test cases for our node app.
Support our IDKBlogs team
Creating quality content takes time and resources, and we are committed to providing value to our
readers.
If you find my articles helpful or informative, please consider supporting us financially.
Any amount (10, 20, 50, 100, ....), no matter how small, will help us continue to produce
high-quality content.
Thank you for your support!
Thank you
I appreciate you taking the time to read this article. The more that you read, the more things you will know. The more that you learn, the more places you'll go.
If you’re interested in Node.js or JavaScript this link will help you a lot.
If you found this article is helpful, then please share this article's link to your friends to whom this is required, you can share this to your technical social media groups also.
You can follow us on our social media page for more updates and latest article updates.
To read more about the technologies, Please
subscribe us, You'll get the monthly newsletter having all the published
article of the last month.


