Create and install a basic Chrome Extension in your chrome browser:
B
uilding chrome extensions are quite easy, here you'll learn how to make chrome extensions for automating your task. After reading this article you'll able to develop chrome extensions for any kind of task. You can get better clarity to develop the chrome extensions. In this article, we'll create a simple Hello World extension and see how we can install this extension in our chrome browser. and use this extension into the browser.
Rules:
Building a chrome extension needs to follow some specific rules like directory structure, fixed filenames etc. Please read this article till the end and follow the instruction as given.
Let's start building the chrome extension:
Step 1: Create a Menifest.json:
Before building this extension, let's make a directory with name chrome-extension, and we will add remaining files inside this folder. later we'll drag this complete directory into chrome://extensions location (we'll see this later)
In this step we'll create a file with name Menifest.json inside the root folder (chrome-extension/Menifest.json) and write the below codes:
Menifest.json:
In the above codes, the value of default_icon should be path of icon which we'll use for extension icon, here we've icon.png. And the value of default_popup should be the path of views or HTML file path, that would be displayed when you click on the extension icon in the chrome. Here we've view.html.
Step 2: Make a view:
In this step, we'll create a view that would be the body of that extension. we'll write our views related
logic in this file. It'll be a HTML file.
Let's create a file with name view.html and write the below code:
As per the above HTML file, our extension will display the text as:
Hello! IDKBlogs
This is a Chrome Extension!
And this is some html - idkblogs.com
We need to make our attention for the script tag, we can see in the script
tag, we have background.js as external file. let's discuss about this file in
the next step.
Step 3: Write javascript logic:
As we added the script tag in the above code, we can write our javascript logic inside the file background.js. We'll write our javascript code as per the requirement, here this is the simple chrome extension so we'll simply write a console in this file and later we'll see this console while executing the extension. So, write the below code in this background.js file:
Step 4: Get the extension icon:
To show extension in the chrome browser, we need a good and better icon. this icon will be used like app
icon.
now download the icon and rename it to icon.png and keet it into root folder.
Here is our app icon:
Now we've done the development, let see project directory:

Create and install a basic Chrome Extension in your chrome browser
Step 5: Install the extension:
Now we've all set, we need to install this extension in our chrome browser. To install this extension open
the chrome browser and hit URL chrome://extensions and drag and drop the whole
directory.
Here our directory name is chrome-extension.
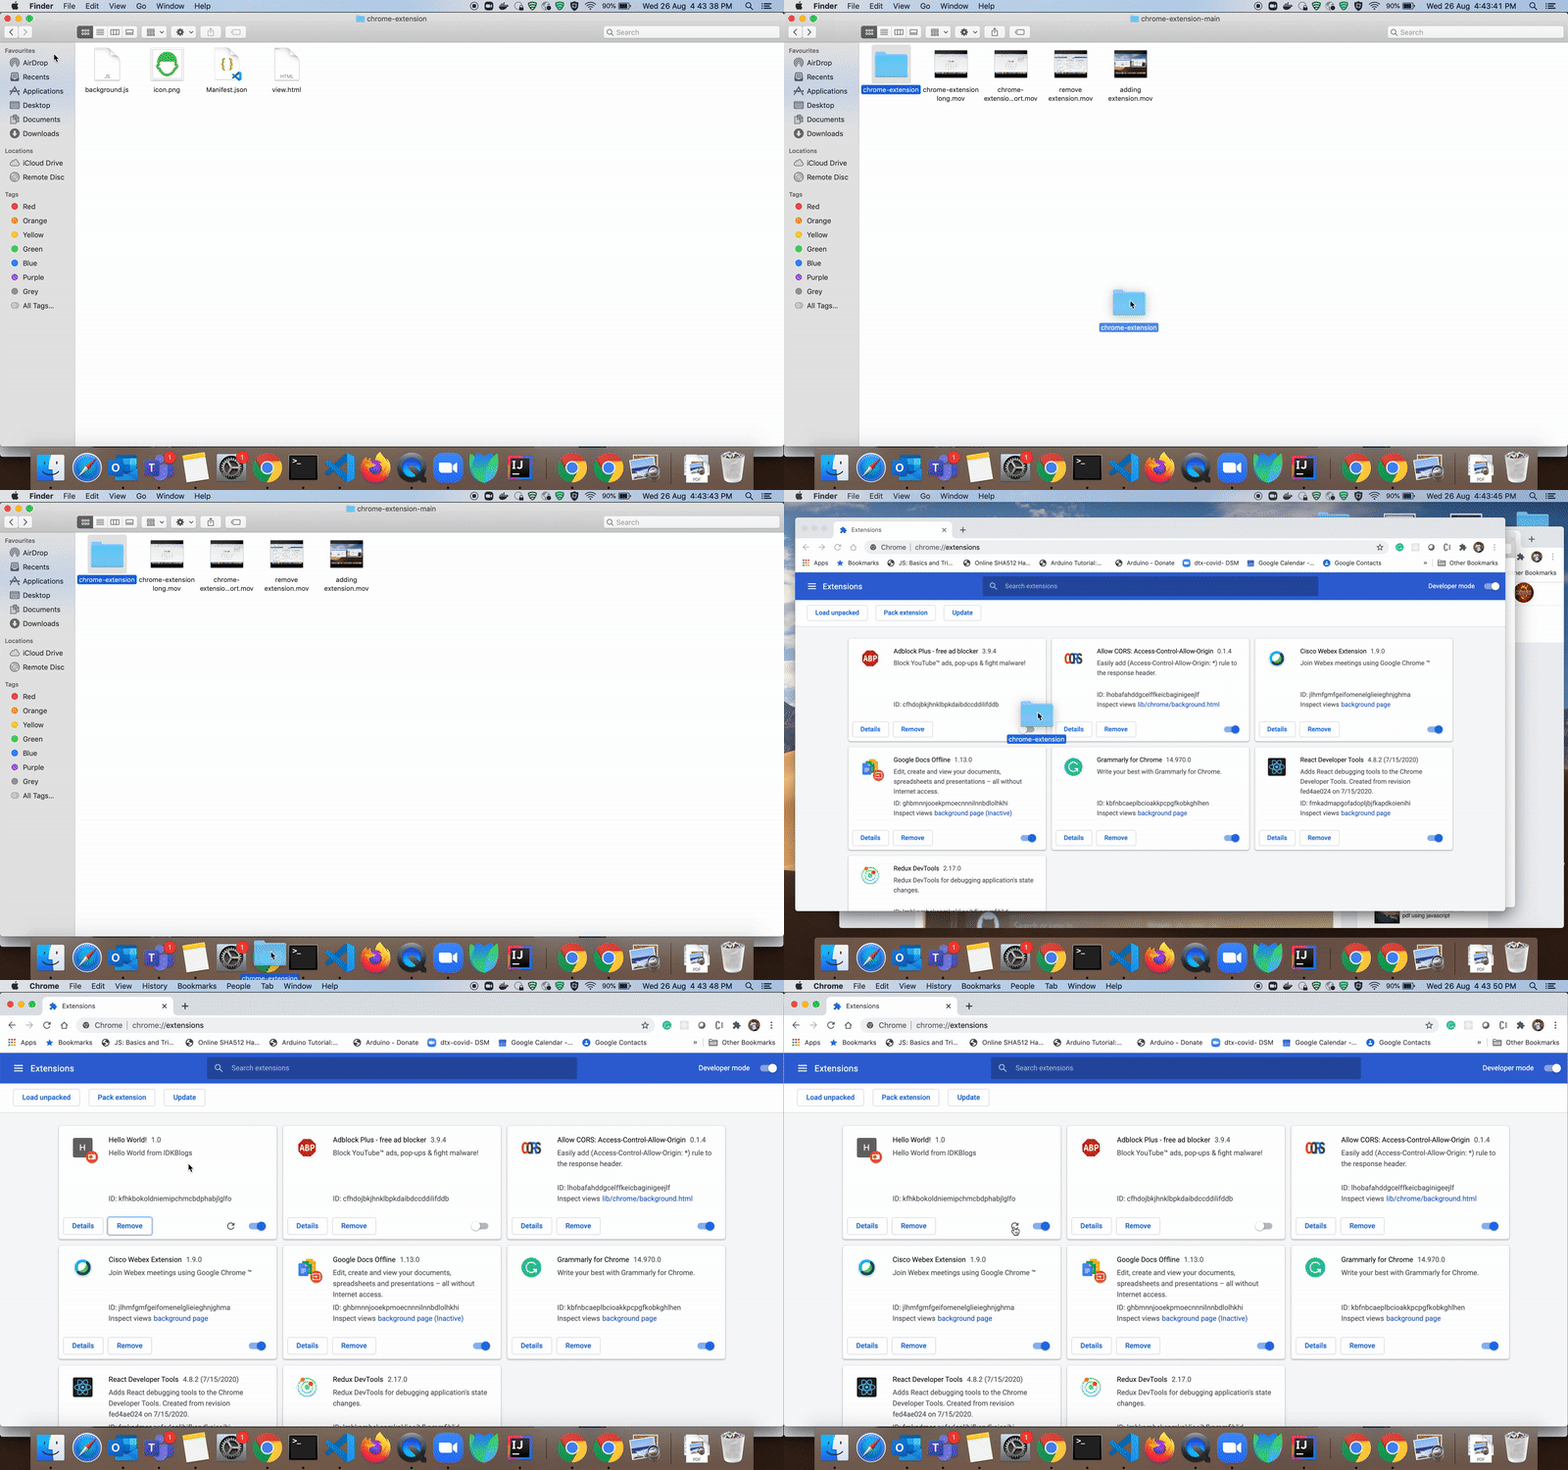
Let's see in the below gif how to drag and drop (install) this extension in our chrome app.
Create and install a basic Chrome Extension in your chrome browser
After successful drag and drop, our extension will be installed in our chrome app, yeah, its so simple :),
let's open this extension in our chrome in the next step.
Step 6: Open and use the extension:
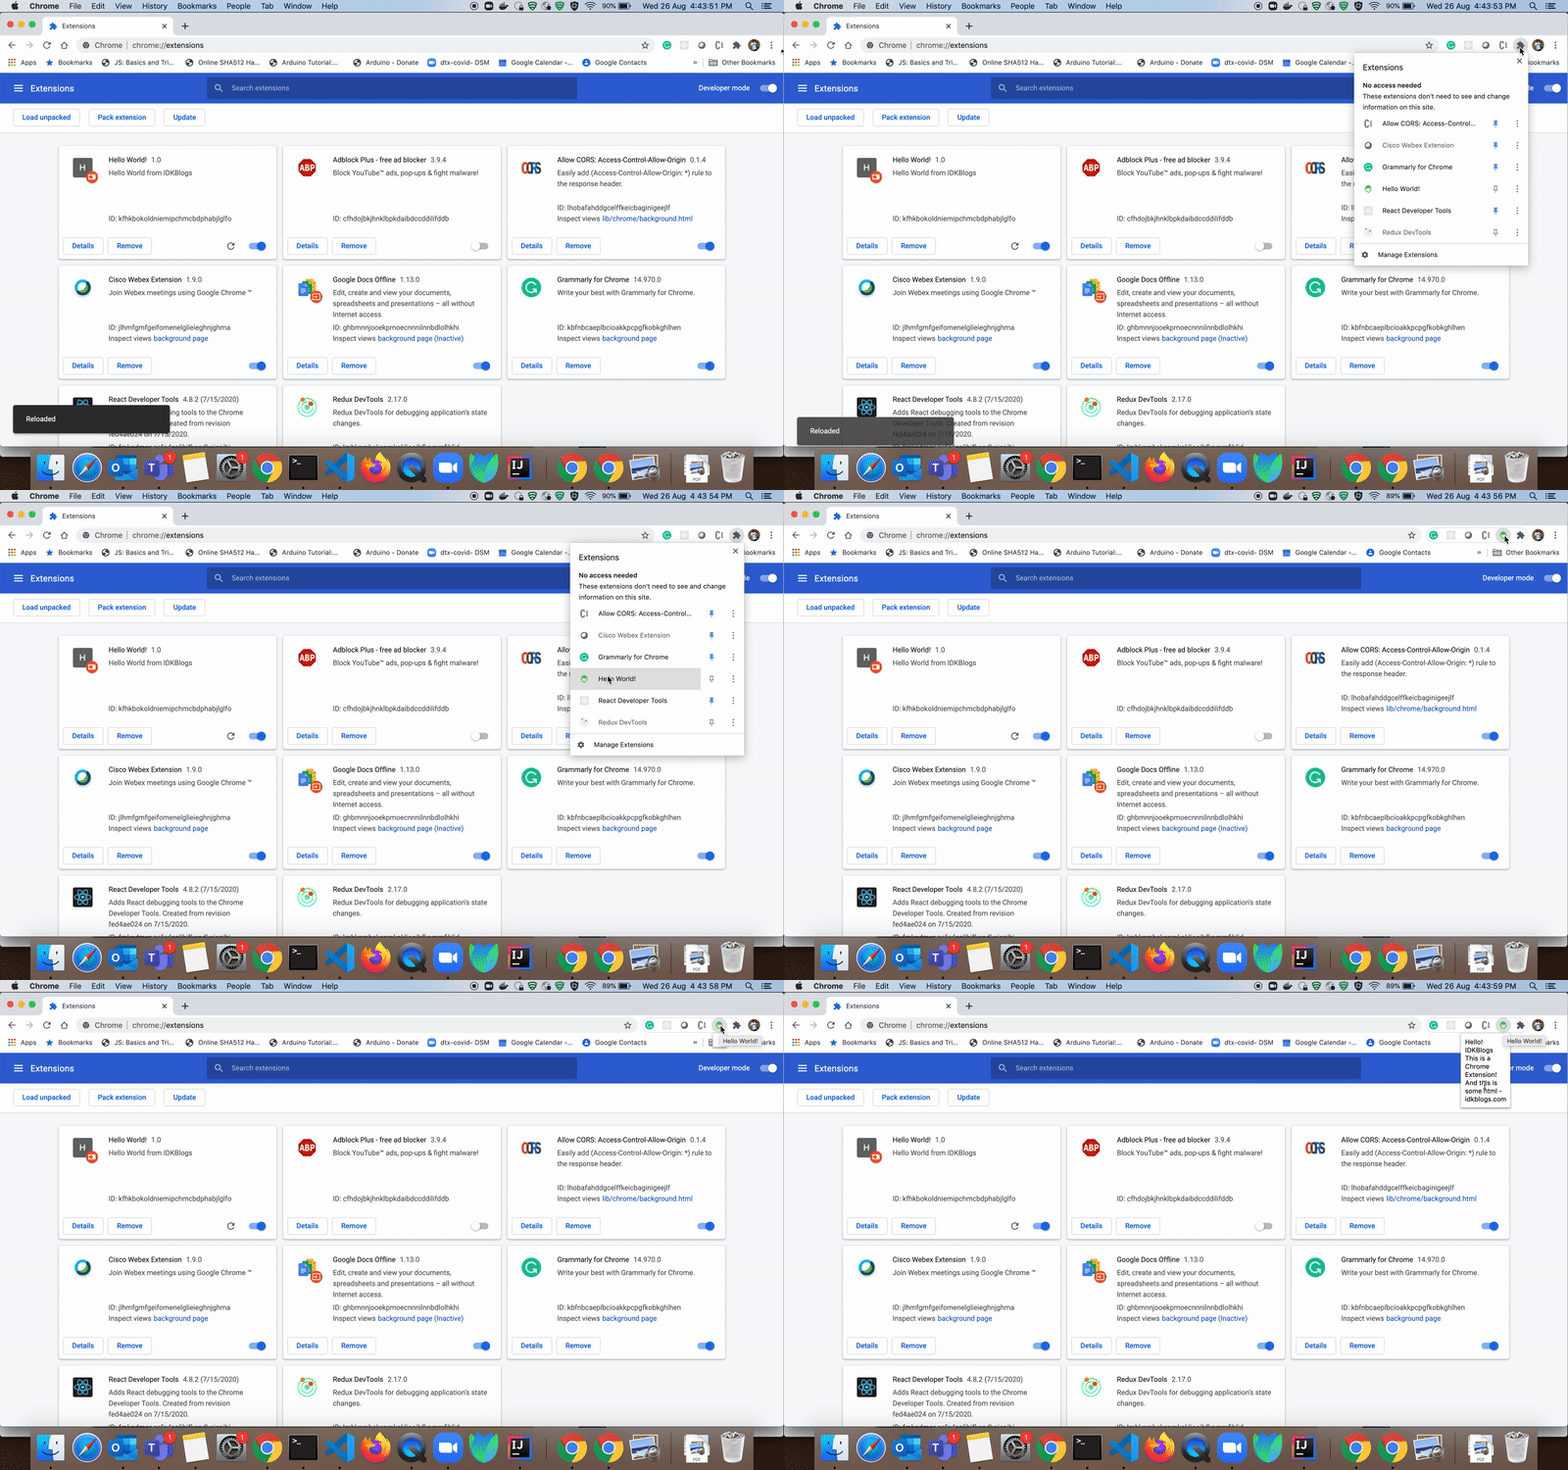
After the successful installation, we need to open and use this extension, let's see in the below gif how to open and use:
Create and install a basic Chrome Extension in your chrome browser
In the extension, we can see the output of the view.html, So the result is coming from our view.html file
Step 7: Verify the javascript file (background.js):
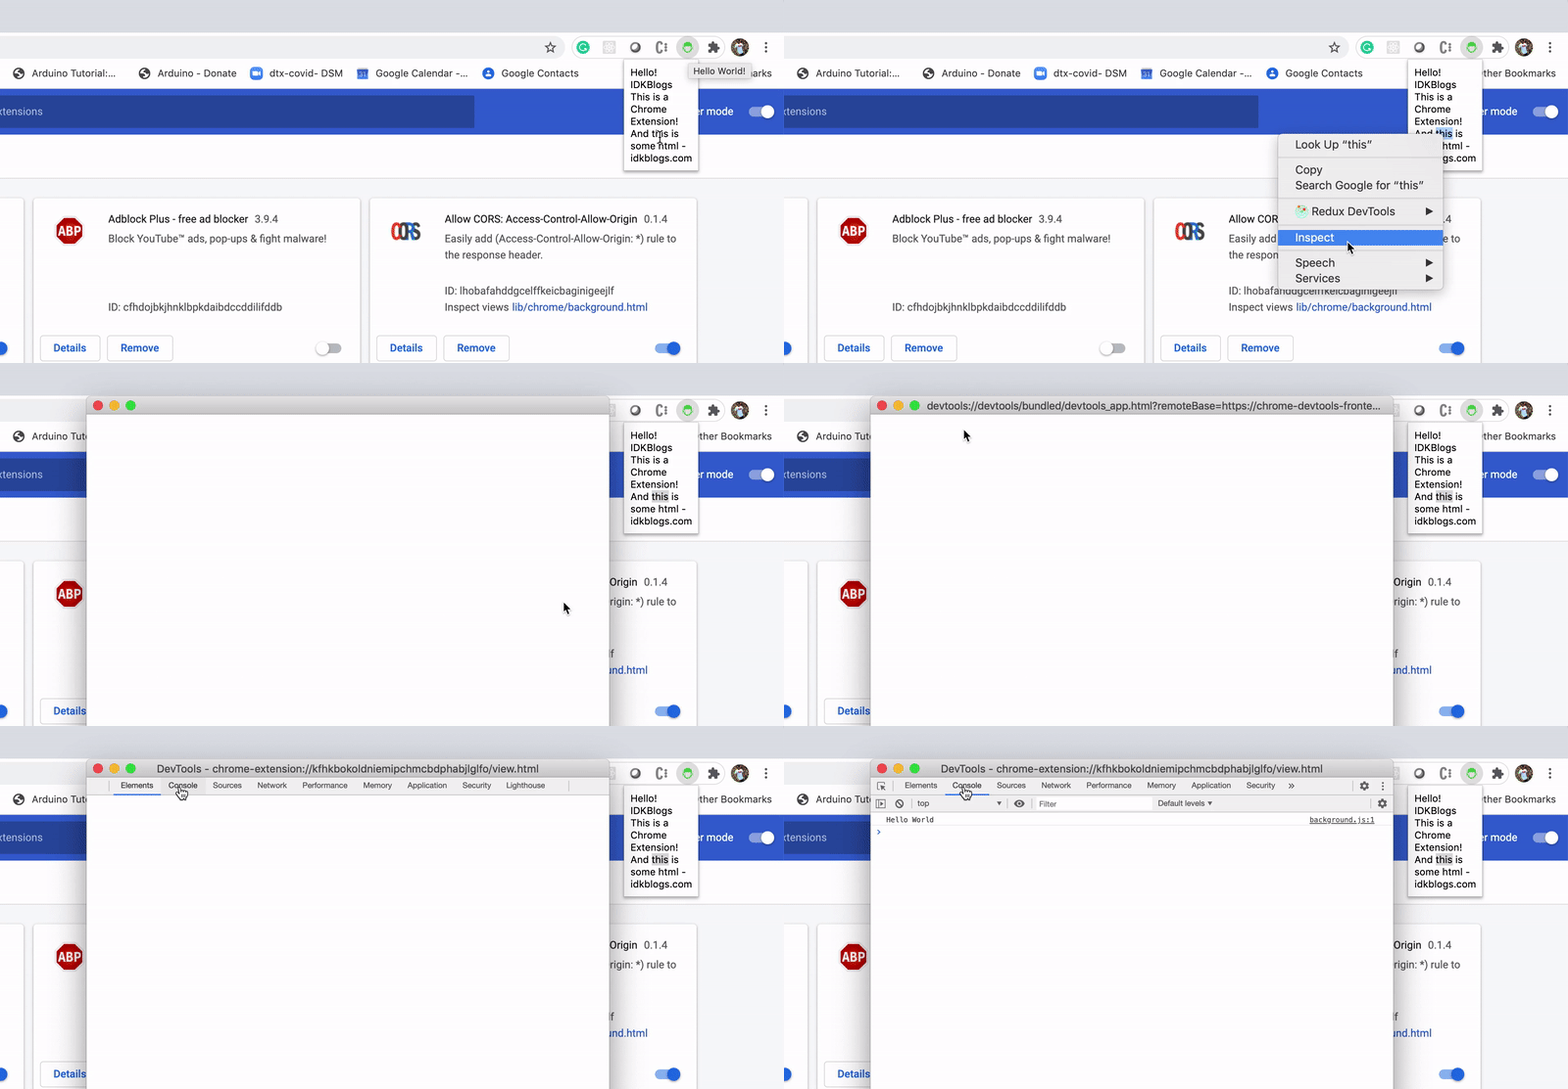
If you remember, we have added a script with filename background.js and wrote a console.log('Hello World'), let's verify that file is executed or not:
Let's open the inspect of that output see the message as:
Create and install a basic Chrome Extension in your chrome browser
you can see in the above gif, the Hello World is showing.
Congrats..
That's it. We made our own chrome extension and used it in our chrome browser.
Now we're able to develop our own chrome extensions for any purpose. we can make our chrome extension for filing the form, taking the snapshots, for music, for validating any information,
for text, word and spelling check, etc.
Support our IDKBlogs team
Creating quality content takes time and resources, and we are committed to providing value to our
readers.
If you find my articles helpful or informative, please consider supporting us financially.
Any amount (10, 20, 50, 100, ....), no matter how small, will help us continue to produce
high-quality content.
Thank you for your support!
Thank you
I appreciate you taking the time to read this article. The more that you read, the more things you will know. The more that you learn, the more places you'll go.
If you’re interested in Node.js or JavaScript this link will help you a lot.
If you found this article is helpful, then please share this article's link to your friends to whom this is required, you can share this to your technical social media groups also.
You can follow us on our social media page for more updates and latest article updates.
To read more about the technologies, Please
subscribe us, You'll get the monthly newsletter having all the published
article of the last month.
