BitBucket CI/CD with AWS ECR and Kubernetes: Streamlining Your Node.js Development Process
Continuous Integration and Continuous Deployment (CI/CD) practices have revolutionized software development by automating the build, test, and deployment processes. BitBucket and AWS ECR (Elastic Container Registry) are two popular tools that can be combined to create a robust CI/CD pipeline for Node.js applications. In this article, we will explore how to integrate BitBucket with AWS ECR, providing a step-by-step guide and a complete example in Node.js. We will also provide a working bitbucket-pipelines.yml file to help you get started quickly.High Level CI/CD Plan:
Let's have a look at high level flow of CI/CD integration with Bitbucket, AWS, ECR and Kubernetes-
Create AWS ECR to hold the Docker image in the ECR registry.
-
Create a bitbucket-pipelines.yml file to configure the CI/CD
-
Configure the CI/CD along with the pipelines for branches
-
Add the Steps for specific branches in the bitbucket-pipelines.yml file mainly for Build_Push and Prod_Deploy
-
In the step Build_Push:
- Configure AWS credentials for ECR access
- Set environment variables for the application and AWS ECR repository
- Log in to the AWS ECR repository using the AWS CLI
- Build the Docker image
- Push the Docker image to the ECR registry.
(Build_Push step builds the Docker image, pushes it to the ECR registry, and saves relevant artifacts for further reference or deployment.)
- In the Step Prod_Deploy:
- Downloads the kubectl binary, which is the command-line tool to interacting with Kubernetes clusters.
- Copies the Kubernetes configuration file to the appropriate location.
- Makes the kubectl binary executable.
- Defines the image tag based on the BitBucket branch and commit.
- Retrieves the available Kubernetes contexts.
- Sets the Kubernetes context for the desired EKS cluster.
- Applies the deployment configuration file to create the objects in the Kubernetes cluster.
In this Prod_Deploy step: the code prepares the environment, retrieves the required tools, sets up authentication, updates the deployment configuration file, and deploys the application to the specified Kubernetes cluster using kubectl apply.
- Create .kube directory and write Kubernetes config file and the kube-prod-eks-deployment.yml deployment configuration file
- Define Kubernetes cluster, service objects in file kube-prod-eks-deployment.yml
- Configure BitBucket Repository Variables
- Enable pipeline from bitbucket
- Triggering the CI/CD Pipeline
Prerequisites
Before we begin, make sure you have the following in place:(A). A BitBucket account with a repository containing your Node.js application code.
(B). An AWS account with ECR enabled.
Step 1: Setting up AWS ECR
AWS ECR (Elastic Container Registry) is a fully-managed container registry service provided by Amazon Web Services (AWS). It is used to store, manage, and deploy container images for applications running on container platforms like Docker and Kubernetes.A. Log in to your AWS Management Console.
B. Navigate to the Elastic Container Registry (ECR) service.
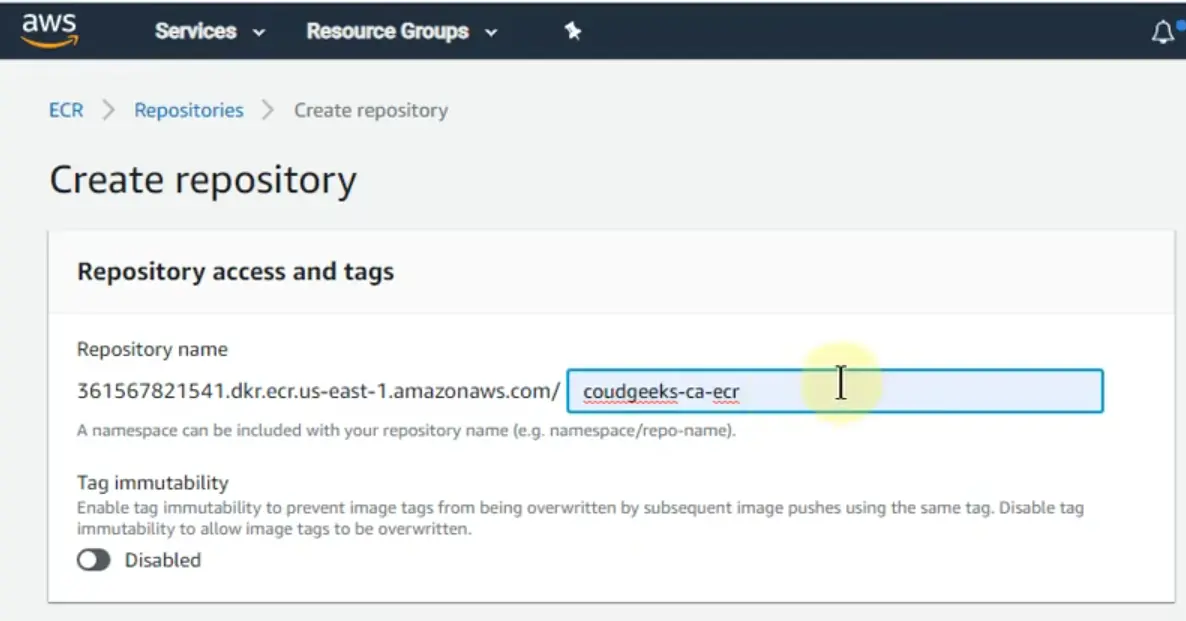
Example image to create ECR repository
C. Create a new repository for your Node.js application by clicking on the "Create repository" button.

Example image of created ECR repository
D. Note down the repository URL as you will need it later.
Question: Is AWS ECR is orchestration tool?
Answer: No,
AWS ECR (Elastic Container Registry) is not an orchestration tool itself. AWS ECR is a container registry service.
It provides a secure and private repository for your container images, ensuring that they are readily available for
deployment on container platforms like Docker and Kubernetes.
On the other hand, orchestration tools, such as Kubernetes, Amazon Elastic Kubernetes Service (EKS), and Docker
Swarm, focus on managing and coordinating the deployment, scaling, and networking of containers across multiple
hosts or nodes. These tools handle tasks like container scheduling, load balancing, service discovery, and automatic
scaling, providing a platform for managing containerized applications in a distributed environment.
While AWS ECR is not an orchestration tool, it is commonly used in conjunction with orchestration platforms like Kubernetes or ECS (Elastic Container Service) to store and manage container images that are then deployed and orchestrated using the respective tools. AWS ECR provides a reliable and scalable container image repository, while orchestration tools handle the runtime management and orchestration of containers based on those images.
Step 2: Configuring BitBucket Pipeline
A. In your BitBucket repository, create a new file called "bitbucket-pipelines.yml" in the root directory.
B. Open the file and add the following code:
C. Kubernetes configured (optional)
bitbucket-pipelines.yml
Let's understand above codes:
image: -> name: 123456789012.dkr.ecr.123456789012.dkr.ecr.ap-south-2.amazonaws.com.amazonaws.com/base/ps:idk-runners
The YAML snippet provided to define an image configuration for a container in a Kubernetes manifest or deployment file, along with AWS credentials for accessing the specified image repository.
* image: This specifies the image configuration for the container.
* name: This field defines the name of the container image.
* 123456789012.dkr.ecr.ap-south-2.amazonaws.com/base/ps:idk-runners: This is the fully qualified name of the container image. It follows the format "registry/repository/image:tag".
In this case:
* 123456789012.dkr.ecr.ap-south-2.amazonaws.com refers to the ECR (Elastic Container Registry) repository URL in the ap-south-2 AWS region.
* base/os is the repository and image name within the ECR repository.
* idk-runners is the tag assigned to the specific version or variant of the image.
This configuration specifies the container image that will be used for the deployment or pod in the Kubernetes cluster. The image name includes the registry URL, repository, image name, and tag. The Kubernetes cluster will pull this image from the specified ECR repository and run it as part of the deployment.
Note that this snippet is just a part of the overall Kubernetes manifest or deployment file, which likely contains additional configuration for the deployment, such as labels, ports, volumes, and more.
definitions->services->docker->memory
To define a memory limit for the Docker service within a configuration file.
* definitions: This section is used to define various configurations or settings.
* services: This subsection specifies the services configuration.
* docker: This subsection specifically refers to the Docker service configuration.
* memory: 3072: This line sets the memory limit for the Docker service to 3072 (presumably in megabytes or a similar unit).
By setting the memory limit for the Docker service, it restricts the amount of memory that the Docker service can utilize within the deployment environment. This can be useful for resource allocation and ensuring that the Docker service does not consume excessive memory, potentially impacting other processes or services running on the same machine or container orchestrator.
Please note that this snippet is likely part of a larger configuration file or infrastructure-as-code definition. The purpose of setting the memory limit for the Docker service may vary depending on the context and the specific deployment or orchestration system being used.
caches->sonar steps->Snyk_Check
To define a cache configuration and a list of steps within a larger configuration file, possibly for a CI/CD pipeline.
* `caches`: This section defines caching configurations for the pipeline.
* `sonar: ~/.sonar/cache`: This line specifies a cache named "sonar" and sets the cache directory to ~/.sonar/cache. Caching is a technique used to store and reuse data between pipeline runs, potentially improving performance by avoiding redundant computations or downloads. In this case, the cache appears to be related to the SonarQube static code analysis tool, and it utilizes the ~/.sonar/cache directory as the cache location.
* `steps`: This section defines a list of steps for the pipeline.
* `- step: &Snyk_Check`: This line begins the definition of a pipeline step named "Snyk_Check" using the &Snyk_Check YAML anchor. The &Snyk_Check anchor can be referenced elsewhere in the YAML file to reuse this step configuration. The specific details of the step, such as its commands or actions, are likely provided in subsequent lines of the YAML file but are not shown in the provided snippet.
Overall, this snippet indicates the configuration of a cache for SonarQube and the definition of a step named "Snyk_Check" within a pipeline. The exact usage and details of the cache and step would depend on the larger context of the pipeline configuration.
pipelines->branches->branch names
The YAML snippet provided defines a pipeline configuration for different branches in a CI/CD setup using Bitbucket Pipelines.
`pipelines`: This section defines the pipeline configuration.`branches`: This subsection specifies the branch-specific configurations.`**`: This is a glob pattern that matches any branch name.`- parallel:`: This line starts a parallel execution block, indicating that the listed steps within it will run concurrently.`step: *Sonar_Quality_Check`:This line refers to a step with the name "Sonar_Quality_Check" defined elsewhere in the YAML file. The*Sonar_Quality_Checkanchor is used to reference the step configuration.`step: *Git_Secrets_Scan`: This line refers to a step with the name "Git_Secrets_Scan" defined elsewhere in the YAML file.`step: *Snyk_Check`: This line refers to a step with the name "Snyk_Check" defined elsewhere in the YAML file.`master`: This is the branch name for the "master" branch.`step: *Build_Push`: This line refers to a step with the name "Build_Push" defined elsewhere in the YAML file.`step: *Prod_Deploy`: This line refers to a step with the name "Prod_Deploy" defined elsewhere in the YAML file.
Pipelines Steps
Step 3: Let's define the steps used in bitbucket-pipelines.yml file
Snyk_Check
The added step for Snyk vulnerability scanning. Snyk is a developer security platform that enables application and cloud developers to secure their whole application — finding and fixing vulnerabilities from their first lines of code to their running cloud.Lets understand, what happening in the above script:
* (A). Configures the AWS CLI with the provided access key ID and other values for the profile named "mfa". The aws_access_key_id and others values are fetched from the BitBucket repository variable.
* (B). npm install: Executes the npm install command to install the project dependencies.
* (C). pipe: snyk/snyk-scan:0.5.2: Uses the Snyk vulnerability scanning pipe with the specified version 0.5.2. Pipes are pre-configured Docker containers that can execute specific tasks within the pipeline.
* (D). variables:: Starts the section for defining variables specific to the Snyk pipe.
* (E). LANGUAGE: "npm": Specifies the programming language used in the project, which is set to "npm" in this case.
* (F). DONT_BREAK_BUILD: "true": Sets the DONT_BREAK_BUILD variable to "true", indicating that the build should not fail even if vulnerabilities are found during the Snyk scan.
This code block configures the BitBucket pipeline to execute the Snyk vulnerability scanning pipe, leveraging the AWS CLI to set up the necessary AWS credentials and region for the Snyk scan. The script also includes the installation of project dependencies using npm.
Sonar_Quality_Check
Lets understand, what happening in the above script:
The code snippet above is an additional step in the BitBucket pipeline configuration for performing Sonar Quality Check.
- The
cachessection specifies the caches that will be used in this step. In this case, thesonarandnodecaches are defined, which helps to speed up subsequent pipeline runs by caching dependencies. - The
exportstatements set environment variables required for SonarCloud analysis, such asSONAR_TOKEN,SONAR_URL,SONAR_ORG,SONAR_PROJECT_KEY, andNODE_ENV. - The
pipecommand is used to run a Docker container provided by SonarSource for SonarCloud analysis. Thesonarsource/sonarcloud-scan:1.4.0container is used, and thevariablessection defines environment variables for the container, includingSONAR_TOKENandEXTRA_ARGS. TheEXTRA_ARGSvariable provides additional configuration options for the SonarCloud analysis, such as project key, organization, project name, version, source directories, test directories, and code coverage report paths. - After the SonarCloud analysis, the pipeline uses another SonarSource provided Docker container,
sonarsource/sonarcloud-quality-gate:0.1.6, to check the quality gate status. Thevariablessection sets theSONAR_TOKENandSONAR_QUALITY_GATE_TIMEOUTenvironment variables. TheSONAR_QUALITY_GATE_TIMEOUTspecifies the maximum time to wait for the quality gate to complete.
Git_Secrets_Scan
Lets understand, what happening in the above script:
Here is an explanation of the additional step in the BitBucket pipeline configuration for Git Secrets Scan.
- The
pipecommand is used to run a Docker container provided by Atlassian for Git Secrets scanning. Theatlassian/git-secrets-scan:0.6.0container is used to perform the scan for potential secrets in the repository. - This step helps identify any potential secrets, such as API keys or sensitive information, that may have been accidentally committed to the repository.
Test_case
Lets understand, what happening in the above script:
Here is an explanation of the additional step in the BitBucket pipeline configuration for running test cases:
- The
cachessection specifies the cache to be used in this step, which is thenodecache. This cache helps to speed up subsequent pipeline runs by caching Node.js dependencies. - The
exportstatement sets theSONAR_PROJECT_KEYenvironment variable, which might be required for further analysis or reporting. - The
npm installcommand is used to install the Node.js dependencies required for running the tests. - The
npm run testcommand executes the test suite for the Node.js application. - The
artifactssection specifies the files that should be saved as artifacts after the step completes. In this case, thecode-coverage/lcov.infofile, which contains the code coverage information, and thetest-report.xmlfile, which contains the test results, will be saved as artifacts.
Build_Push
Lets understand, what happening in the above script:
Here is an explanation of the additional step in the BitBucket pipeline configuration for building and pushing the Docker image:
Explanation:
- The code defines a new step named "Build and Push" using the
- stepkeyword. - The
namefield specifies the name of the step, which in this case is "Build and Push." - The
sizethe field specifies the size of the step, which is set to2xfor increased resources. - The
servicessection lists the required services for this step, in this case, thedockerservice is specified. - The
cachesthe section specifies the cache to be used in this step, which is thesonarcache. - The
scriptsection contains the commands that will be executed during this step. - The commands perform various tasks:
- Check the Docker version
- Configure AWS credentials for ECR access
- Set environment variables for the application and AWS ECR repository
- Output the tag to a
TAG.txtfile - Set the
NODE_ENVto production - Configure AWS MFA profile for accessing AWS resources
- Install dependencies, prune unnecessary packages, and build the project
- Use
node-pruneto remove unused files and directories - Output the contents of the
dist/directory - Log in to the AWS ECR repository. Use
aws ecr get-login-passwordto retrieve the Docker registry login password for the specified region and login to the ECR registry using the AWS CLI. - Build the Docker image using the specified image name and tag (
$IMAGE_NAME_COMMIT). - Push the Docker image to the ECR registry.
- Output the
BITBUCKET_BUILD_NUMBERenvironment variable, which is set to$IMAGE_NAME_COMMIT, to aset_env.shfile. - Display the contents of the
set_env.shfile. - The
artifactssection lists the files and directories that should be saved as artifacts after the step completes. In this case, it includes:node_modules/: The Node.js dependencies directory.dist/: The output directory containing the built application..scannerwork/report-task.txt: The SonarQube report task file (commented out in this example).TAG.txt: The file containing the tag information.set_env.sh: The file containing theBITBUCKET_BUILD_NUMBERenvironment variable.
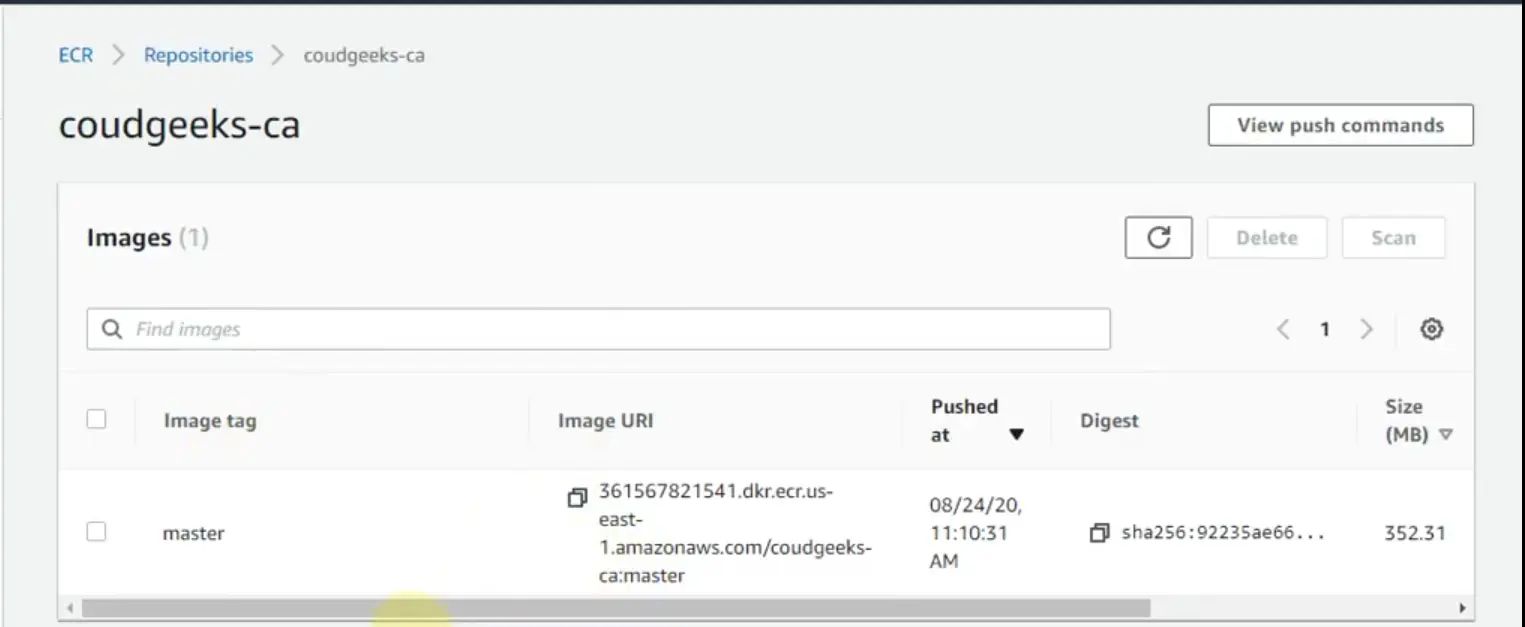
Example image of docker image uploaded on AWS ECR
Prod_Deploy
Lets understand, what happening in the above script:
The provided BitBucket pipeline code is responsible for deploying the application to a production environment using Kubernetes on AWS EKS (Elastic Kubernetes Service). Let's break down the code step by step:
-
step: &Prod_Deploy: This defines a step named "prod-deploy" and creates an anchor called "Prod_Deploy" for reuse. -
name: 'prod-deploy': Specifies the name of the step, which will be displayed in the pipeline logs. -
image: atlassian/pipelines-awscli: Specifies the Docker image to use for this step, which includes the AWS CLI tools. -
oidc: true: Enables the use of OpenID Connect (OIDC) for AWS authentication. -
script: -The series of commands to be executed within the step.(a).
apk add curl: Installs thecurlcommand-line tool.(b).
curl -o kubectl: Downloads thekubectlbinary, which is the command-line tool for interacting with Kubernetes clusters.(c).
mkdir ~/.kube: Creates a directory for storing the Kubernetes configuration file.(d).
cp .kube/config ~/.kube/config: Copies the Kubernetes configuration file to the appropriate location.(e).
chmod +x ./kubectl: Makes thekubectlbinary executable.(f).
mkdir -p $HOME/bin: Creates a directory for storing thekubectlbinary and adds it to the PATH environment variable.(g).
export AWS_REGION=ap-south-2: Sets the AWS region to "ap-south-2".(h).
export AWS_ROLE_ARN=$AWS_IDK_BITBUCKET_OIDC_ROLE: Sets the AWS role ARN for authentication.(i).
export IMGTAG=$BITBUCKET_BRANCH-$BITBUCKET_COMMIT: Defines the image tag based on the BitBucket branch and commit.(j).
export TAG=$BITBUCKET_BRANCH-$BITBUCKET_COMMIT: Defines the tag based on the BitBucket branch and commit.(k).
export AWS_WEB_IDENTITY_TOKEN_FILE=$(pwd)/web-idk-identity-token: Sets the file path for the AWS web identity token.(l).
echo $BITBUCKET_STEP_OIDC_TOKEN > $(pwd)/web-idk-identity-token: Writes the BitBucket OIDC token to the web identity token file.(m).
sed -i 's/\$IMGTAG'"/$TAG/g" .kube/kube-prod-eks-deployment.yml: Updates the Kubernetes deployment configuration file, replacing the$IMGTAGplaceholder with the actual tag.(n).
./kubectl config get-contexts: Retrieves the available Kubernetes contexts.(o).
kubectl config use-context arn:aws:eks:ap-south-2:123456654321:cluster/AWS-MUM-DEV-IDK-BE: Sets the Kubernetes context for the desired EKS cluster.(p).
kubectl apply -f .kube/kube-prod-eks-deployment.yml: Applies the deployment configuration file to create the objects in the Kubernetes cluster. -
services:docker: Specifies that thedockerservice should be started before running this step. This is necessary if your application depends on Docker.
By following this pipeline, the code prepares the environment, retrieves the required tools, sets up authentication, updates the deployment configuration file, and deploys the application to the specified Kubernetes cluster using kubectl apply.
Note: Some variables used in the code, such as $AWS_IDK_BITBUCKET_OIDC_ROLE, $BITBUCKET_BRANCH, and $BITBUCKET_COMMIT, should be defined
Step 4: Enable pipeline and Configure BitBucket Repository Variables
in this step, we need to enable the bitbucket pipeline from bitbucket.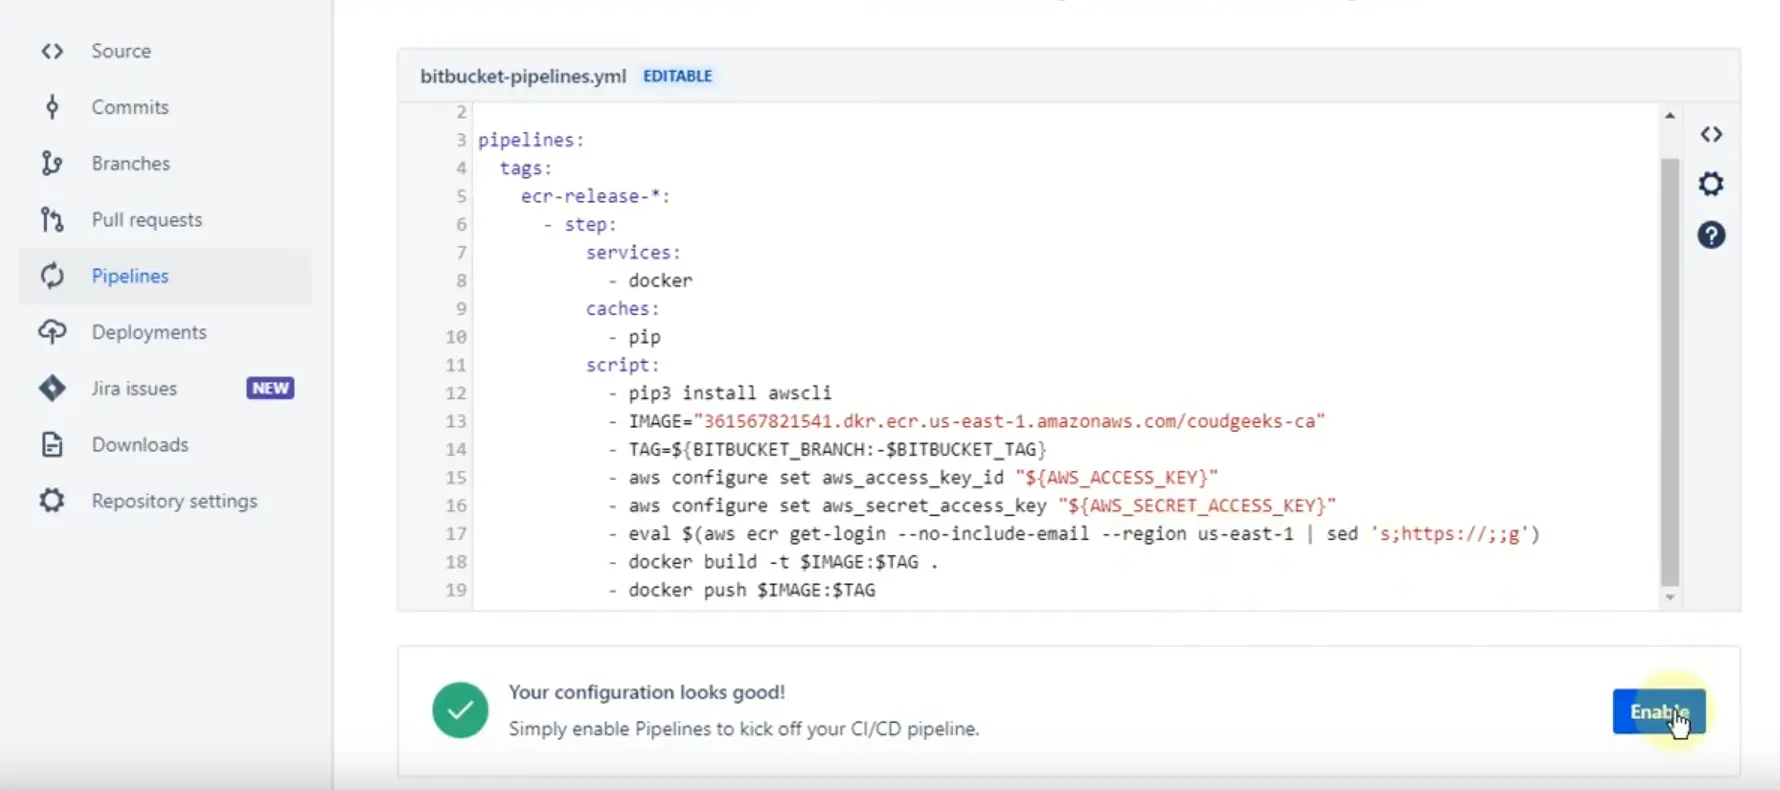
Example image to enable the bitbucket pipelines for CI/CD
Configure BitBucket Repository Variables whatevery required in your bitbucket-pipelines.yml file.
(A). In your BitBucket repository, navigate to the "Settings" tab.
(B). Select "Repository settings" and click on "Repository variables."
(C). Add the following environment variables:
For eaxample
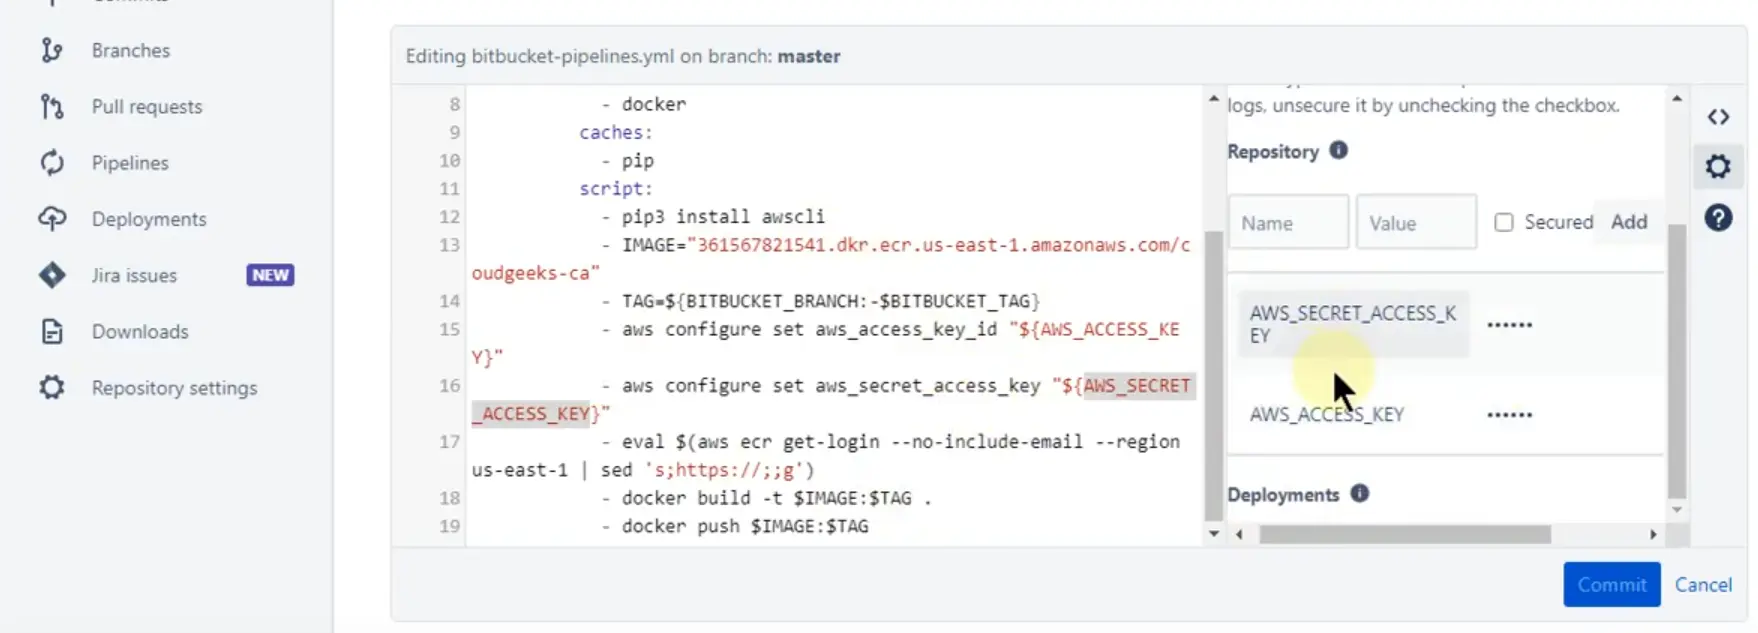
Example image to add the environment variable for CI/CD
Step 5: Let's have a quick look on .kube directory
Here is the sample config file structure and data context in Kubernetes.
.kube/config
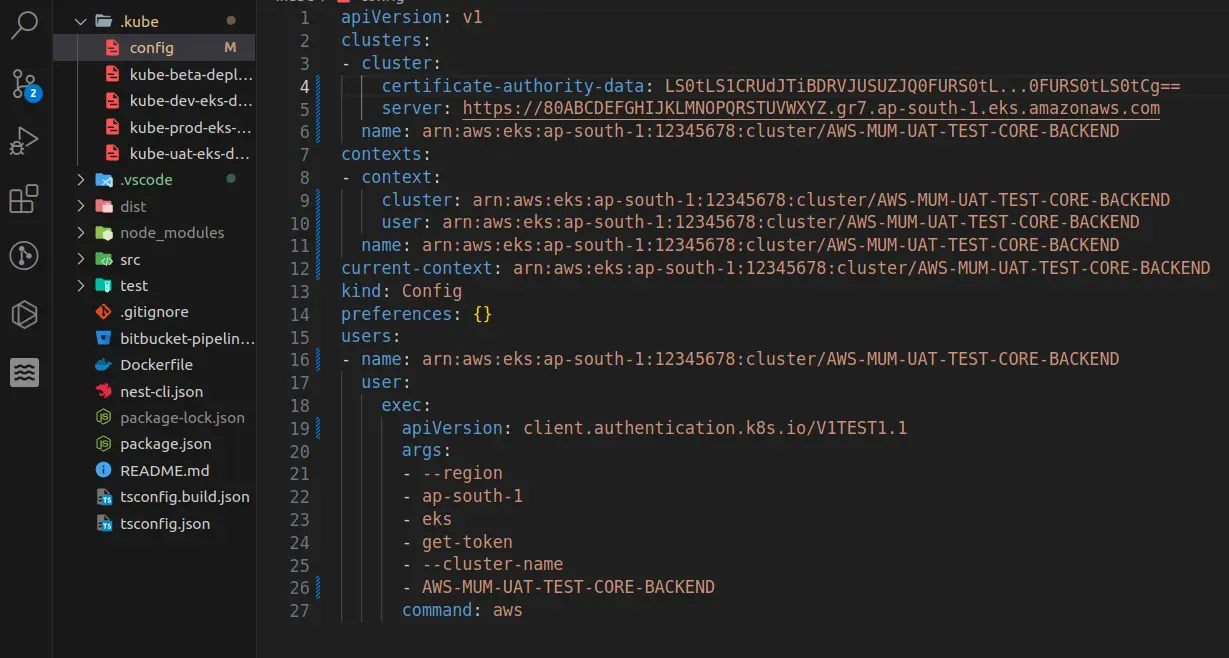
Example image of config file in .kube directory
Let's understand the above configuration file.
The provided Kubernetes configuration file is written in YAML format and describes the configuration for accessing an AWS EKS (Elastic Kubernetes Service) cluster. Let's break down the different sections and their meaning:
-
apiVersion: v1: Specifies the API version of the Kubernetes configuration. -
clusters: Defines a list of clusters that can be accessed.a.
cluster:: Begins the definition of a cluster.b.
certificate-authority-data: LS0tLS1CRUdJTiBDRVJUSUZJQ0FURS0tL...0FURS0tLS0tCg==: Specifies the Base64-encoded certificate authority (CA) data for the cluster.c.
server: https://80ABCDEFGHIJKLMNOPQRSTUVWXYZ.gr7.ap-south-2.eks.amazonaws.com: Specifies the URL endpoint of the Kubernetes API server for the cluster.d.
name: arn:aws:eks:ap-south-2:12345678:cluster/AWS-MUM-DEV-IDK-BE: Provides a name for the cluster configuration. -
contexts: Defines a list of contexts, which are combinations of clusters and users that determine which cluster and user are active in the current context.a.
- context:: Begins the definition of a context.b.
cluster: arn:aws:eks:ap-south-2:12345678:cluster/AWS-MUM-DEV-IDK-BE: Specifies the cluster associated with the context.c.
user: arn:aws:eks:ap-south-2:12345678:cluster/AWS-MUM-DEV-IDK-BE: Specifies the user associated with the context.d.
name: arn:aws:eks:ap-south-2:12345678:cluster/AWS-MUM-DEV-IDK-BE: Provides a name for the context. -
current-context: arn:aws:eks:ap-south-2:12345678:cluster/AWS-MUM-DEV-IDK-BE: Specifies the current context, which defines the cluster and user to use for executing commands. -
kind: Config: Defines the type of configuration object as a Kubernetes configuration. -
preferences: {}: Specifies any user preferences for the Kubernetes configuration. -
users: Defines a list of users that can authenticate with the cluster.a.
- name: arn:aws:eks:ap-south-2:12345678:cluster/AWS-MUM-DEV-IDK-BE: Provides a name for the user configuration.b.
user:: Begins the definition of a user.c.
exec:: Specifies that authentication is performed using an external command.d.
apiVersion: client.authentication.k8s.io/V1TEST1.1: Specifies the API version for the authentication command.e.
args:: Defines the arguments to pass to the authentication command.f.
region: Specifies the AWS region.g.
ap-south-2: Specifies the region value.h.
eks: Specifies the target command for authentication.i.
get-token: Specifies the subcommand for retrieving the authentication token.j.
cluster-name: Specifies the name of the EKS cluster.k.
AWS-MUM-DEV-IDK-BE: Specifies the cluster name value.l.
command: aws: Specifies the executable command to run for authentication.
This configuration file is used by the kubectl command-line tool to authenticate and access the specified EKS cluster. The clusters the section provides the necessary information about the cluster, the contexts the section defines the active context and the users the section specifies the authentication method using the AWS CLI.
And here is the sample file kube-prod-eks-deployment.yml file to create objects, and services in the Kubernetes dashboard.
.kube/kube-prod-eks-deployment.yml
The provided code is a Kubernetes configuration file that defines a Deployment and a Service for a test application called "test-app-dev" in the "idk-myapps-dev" namespace. Let's break down the code line by line:
-
apiVersion: $APIVERSION: Specifies the API version of the Kubernetes resources. The value of$APIVERSIONshould be provided elsewhere in the context. -
kind: Deployment: Specifies that the following YAML describes a Deployment resource. -
metadata:: Provides metadata for the Deployment.a.
labels:: Defines labels to identify the Deployment. In this case, the label "app" is set to "test-app-dev".b.
name: test-app-dev: Specifies the name of the Deployment as "test-app-dev".c.
namespace: idk-myapps-dev: Specifies the namespace where the Deployment will be created as "idk-myapps-dev". -
spec:: Specifies the desired state of the Deployment.a.
replicas: 1: Defines the number of replicas (instances) of the application to run, in this case, 1 replica.b.
selector:: Specifies the label selector for the Pods managed by the Deployment.matchLabels:: Defines the labels that Pods must have to be selected. In this case, the label "app" is set to "test-app-dev". c.
strategy:: Specifies the update strategy for the Deployment.-
rollingUpdate:: Specifies rolling updates, where Pods are updated incrementally.-
maxSurge: 100%: Specifies the maximum number or percentage of Pods that can be created above the desired number of replicas during an update. -
maxUnavailable: 0: Specifies the maximum number or percentage of Pods that can be unavailable (not ready) during an update.
-
-
type: RollingUpdate: Specifies the type of update strategy as RollingUpdate. d.
template:: Specifies the Pod template for the Deployment.-
metadata:: Provides metadata for the Pod template.labels:: Defines labels for the Pods created from this template. In this case, the label "app" is set to "test-app-dev".
-
spec:: Specifies the desired state of the Pods.-
serviceAccountName: kafka-myuat-idk-myapps: Specifies the name of the ServiceAccount associated with the Pods. -
containers:: Defines the containers to run in the Pods.-
env:: Specifies environment variables for the container.-
name: NODE_ENV: Sets the value of the "NODE_ENV" environment variable to "dev". -
name: PORT: Sets the value of the "PORT" environment variable to "3000". -
name: APP_NAME: Sets the value of the "APP_NAME" environment variable to "test-app-dev". -
name: BASE_PATH: Sets the value of the "BASE_PATH" environment variable to "dev/idk-blogs". -
name: DD_AGENT_HOST: Sets the value of the "DD_AGENT_HOST" environment variable to the host IP using a field reference. -
name: SOME_VALUE_FROM_AWS_SECRETS: Sets the value of the "SOME_VALUE_FROM_AWS_SECRETS" environment variable using a secret key reference.
-
-
image: 123456789012.dkr.ecr.ap-south-2.amazonaws.com/idk-blogs:$IMGTAG: Specifies the container image to run. The value of$IMGTAGshould be provided elsewhere in the context. -
livenessProbe:: Specifies a probe to check the liveness of the container. -
readinessProbe:: Specifies a probe to check the readiness of the container. -
startupProbe:: Specifies a probe to check the startup of the container. -
lifecycle:: Defines lifecycle hooks for the container. -
imagePullPolicy: Always: Specifies that the container image should always be pulled. -
name: idk-blogs: Specifies the name of the container as "idk-blogs". -
ports:: Defines the ports to expose in the container. -
resources:: Specifies resource requirements for the container.
-
-
dnsConfig:: Configures DNS settings for the Pods. -
restartPolicy: Always: Specifies that the Pods should always be restarted if they terminate.
-
The next part of the code defines a Service resource for the "test-app-dev" application in the same namespace.
-
apiVersion: v1: Specifies the API version for the Service resource. -
kind: Service: Specifies that the following YAML describes a Service resource. -
metadata:: Provides metadata for the Service.a.
name: test-app-dev: Specifies the name of the Service as "test-app-dev".b.
namespace: idk-myapps-dev: Specifies the namespace where the Service will be created as "idk-myapps-dev".
-
spec:: Specifies the desired state of the Service.a.
type: ClusterIP: Specifies that the Service should be accessible only within the cluster.b.
ports:: Specifies the ports to expose in the Service.-
name: test-app-dev: Specifies the name of the port as "test-app-dev". -
port: 3000: Specifies the port number. -
targetPort: 3000: Specifies the target port number. -
protocol: TCP: Specifies the protocol for the port. c.
selector:: Specifies the label selector for the Pods that the Service should target. In this case, the label "app" is set to "test-app-dev". -
This configuration file can be applied to a Kubernetes cluster using kubectl apply -f <filename.yaml>. It will create a Deployment with one replica of the "test-app-dev" application and a corresponding Service to expose it internally within the cluster.
Step 6: Triggering the CI/CD Pipeline
Commit and push your code changes to the BitBucket repository.
The BitBucket pipeline will automatically start running.
The pipeline will build your Node.js application, create a Docker image, and push it to the AWS ECR repository, create your project in configured Kubernetes.
Let's understand some of the commands used in this CI/CD:
aws configure --profile mfa set aws_access_key_id $AWS_ACCESS_KEY_ID
Let's break down the command:
* aws configure: This is the AWS CLI command used to configure the AWS CLI settings.
* -profile mfa: This specifies the name of the AWS CLI profile to be configured. In this case, the profile name is "mfa".
* set: This is a subcommand of aws configure that sets the configuration values for the specified profile.
* aws_access_key_id $AWS_ACCESS_KEY_ID: This sets the value of the AWS access key ID for the specified profile. The value is being passed from an environment variable called $AWS_ACCESS_KEY_ID.
In Bitbucket Pipelines, environment variables can be set at the pipeline level or within individual steps. In this case, the AWS access key ID is expected to be provided as an environment variable $AWS_ACCESS_KEY_ID, which will be passed to the aws configure command to set the access key ID for the "mfa" profile.
This configuration is typically required if you want to use AWS CLI commands within your Bitbucket Pipeline, such as deploying to an AWS service or interacting with AWS resources. The access key ID is used to authenticate and authorize access to your AWS account and resources.
aws configure set default.region $AWS_DEFAULT_REGION
echo "export TAG=$BITBUCKET_BRANCH-$BITBUCKET_COMMIT" > TAG.txt"
curl -sf https://gobinaries.com/tj/node-prune | sh
In summary, this script line uses curl to download the script "node-prune" from the specified URL, and then pipes the downloaded script to the sh command, which executes it.
The purpose of this script could vary depending on the specific pipeline and project requirements. Generally, it suggests that "node-prune" is being used as part of the pipeline to perform some actions related to Node.js dependencies or project cleanup. It could be used to remove unnecessary or unused dependencies from a Node.js project or perform other related tasks.
"aws ecr get-login-password --region ap-south-2 | docker login --username AWS --password-stdin 123456789012.dkr.ecr.ap-south-2.amazonaws.com"
In summary, this script line retrieves the authentication token (password) for an AWS ECR registry in the "ap-south-2" region using the AWS CLI command aws ecr get-login-password, and then uses that token to perform a Docker login to the ECR registry using the docker login command.
This authentication and login step is necessary to access and interact with the ECR registry. It ensures that the Docker client is authenticated and authorized to push or pull container images from the specified ECR repository.
"curl -o kubectl https://s3.us-west-2.amazonaws.com/amazon-eks/1.18.9/2020-11-02/bin/linux/amd64/kubectl"
In summary, this script line uses curl to download the kubectl binary from the specified URL and saves it as a file named "kubectl". The kubectl binary is a command-line tool used to interact with Kubernetes clusters.
This line is typically used in a Bitbucket Pipeline step to ensure that the kubectl binary is available for subsequent Kubernetes-related operations. By downloading the kubectl binary, the pipeline can execute commands against a Kubernetes cluster, such as deploying applications, managing resources, or retrieving cluster information.
"chmod +x ./kubectl"
`+x`: This is an argument provided to the chmod command, where`+x` specifies adding executable permissions.
In summary, this script line sets the executable permissions for the kubectl binary file, allowing it to be executed as a command. The +x argument adds the executable permission for the file, enabling it to be run by the user.
Setting executable permissions with chmod +x is necessary to execute the kubectl binary file as a command-line tool in subsequent steps of the pipeline. Once the permissions are granted, you can use the kubectl command to interact with Kubernetes clusters and perform various operations, such as managing resources, deploying applications, or retrieving cluster information.
"sed -i 's/\$IMGTAG'"/$TAG/g" .kube/kube-prod-eks-deployment.yml"
In summary, this script line uses sed to modify the specified YAML file (kube-prod-eks-deployment.yml). It searches for the exact string $IMGTAG and replaces it with the value of the $TAG variable. The modification is done directly in the file due to the -i option.
This substitution operation is commonly used to dynamically update values in configuration files or templates during the deployment process. In this case, it allows you to replace the $IMGTAG placeholder in the YAML file with the value of the $TAG variable, which can be set dynamically in the Bitbucket Pipeline based on the requirements of the deployment.
"./kubectl config get-contexts"
In Kubernetes, a context is a set of access parameters that determine the cluster, user, and namespace that kubectl will interact with. It allows you to switch between different clusters or environments easily.
By running the kubectl config get-contexts command, the pipeline is retrieving the list of available contexts configured on the system. This information includes the name of each context, the associated cluster, the user, and the namespace. It provides visibility into the different Kubernetes environments or clusters that can be targeted for deployments or other operations.
This command can be useful for debugging or verifying the correct configuration of kubectl and the available contexts in your Bitbucket Pipeline setup.
"kubectl config use-context arn:aws:eks:ap-south-2:123456654321:cluster/AWS-MUM-DEV-IDK-BE"
Let's break down the command:
`kubectl`: This is the command-line tool used to interact with Kubernetes clusters.
`config use-context`: This is a kubectl command that sets the current context to the specified context name.
"arn:aws:eks:ap-south-2:123456654321:cluster/AWS-MUM-DEV-IDK-BE": This is the name of the context to be set. In this case, it appears to be an Amazon EKS (Elastic Kubernetes Service) context, identified by an ARN (Amazon Resource Name). The context name includes the AWS region (ap-south-2) and the specific EKS cluster identifier (AWS-MUM-DEV-IDK-BE).
Setting the Kubernetes context allows kubectl to determine the target cluster, user, and namespace for subsequent operations. By using the kubectl config use-context command, the pipeline is instructing kubectl to switch to the specified EKS context, enabling subsequent kubectl commands to interact with the designated EKS cluster.
This command is typically used when working with multiple Kubernetes clusters or environments, allowing the pipeline to target a specific cluster for deployment, management, or other operations.
"kubectl apply -f .kube/kube-prod-eks-deployment.yml"
When running the kubectl apply command, it reads the YAML file specified with the -f flag and applies the resource definitions within it to the Kubernetes cluster. The resources defined in the YAML file could include deployments, services, pods, or any other Kubernetes objects.
By executing this command in the Bitbucket Pipeline, the pipeline is deploying or updating the resources defined in the "kube-prod-eks-deployment.yml" file to the designated Kubernetes cluster. This allows for automated deployments or updates of Kubernetes applications as part of the pipeline process.
Conclusion:
Integrating BitBucket CI/CD with AWS ECR offers a powerful solution for automating your Node.js application deployment process. By following the steps outlined in this article, you can set up a robust CI/CD pipeline that streamlines your development workflow. BitBucket's easy configuration and AWS ECR's scalability and reliability make them a perfect combination for managing and deploying your containerized Node.js applications.With BitBucket's version control capabilities and AWS ECR's secure and scalable container registry, you can ensure that your application's code is properly versioned, tested, and deployed in a consistent and efficient manner. The integration allows you to automate the building and pushing of Docker images, making it easier to manage your application's lifecycle from development to production.
By leveraging BitBucket's pipelines and AWS ECR's container management features, you can significantly reduce the time and effort required for manual deployment processes. This automation not only improves efficiency but also reduces the risk of human error and ensures consistent deployments across different environments.
Furthermore, the integration of BitBucket CI/CD with AWS ECR enables seamless collaboration among team members. Developers can work concurrently on different branches, and the CI/CD pipeline ensures that changes are tested and deployed automatically, promoting a continuous integration and deployment culture within your development team.
In conclusion, by harnessing the power of BitBucket CI/CD and AWS ECR, you can achieve efficient, reliable, and scalable deployment workflows for your Node.js applications. Embracing these tools empowers you to focus more on developing quality code and delivering value to your users while leaving the repetitive and error-prone tasks of building, testing, and deploying to the automated pipeline.
Related Keywords:
BitBucket CI/CD with AWS ECR and Kubernetes
Container Image Management
AWS Elastic Kubernetes Service (EKS)
Bitbucket CI/CD with AWS ECR and kubernetes
Bitbucket EKS deployment
Bitbucket CI CD with AWS ECR and kubernetes example
Bitbucket ECS Deploy
Bitbucket Kubernetes
Bitbucket pipeline push to ERC
Support our IDKBlogs team
Creating quality content takes time and resources, and we are committed to providing value to our
readers.
If you find my articles helpful or informative, please consider supporting us financially.
Any amount (10, 20, 50, 100, ....), no matter how small, will help us continue to produce
high-quality content.
Thank you for your support!
Thank you
I appreciate you taking the time to read this article. The more that you read, the more things you will know. The more that you learn, the more places you'll go.
If you’re interested in Node.js or JavaScript this link will help you a lot.
If you found this article is helpful, then please share this article's link to your friends to whom this is required, you can share this to your technical social media groups also.
You can follow us on our social media page for more updates and latest article updates.
To read more about the technologies, Please
subscribe us, You'll get the monthly newsletter having all the published
article of the last month.


![Implement Kafka Module with AWS Secrets Manager in NodeJS with TypeScript [Modularized Code] Implement Kafka Module with AWS Secrets Manager in NodeJS with TypeScript [Modularized Code]](../../../images/node/426_kafka/426_kafka_1.webp)

